
Engineering Design Process vs. Scientific Method: What’s the Difference?
Engineering design process vs. scientific method: what each one is, how science fair judges score them differently, and how to pick the right one.
You pitch a science fair project: build something that actually works. The proposal comes back with one note in red ink. “Where’s your hypothesis?”
This happens more than you’d think. On a physics teachers’ mailing list, one parent described their daughter wanting to build a guitar amplifier out of transistors. Her teacher shut it down because she couldn’t phrase it as a hypothesis. Elsewhere, a student on the Science Buddies forum got a bad grade on an inclinometer project and was told it was “a demonstration,” not a science project.
Building an amplifier is a great project. It just runs on a different process. The scientific method is for answering a question about how the world works. The engineering design process is for building something that solves a problem. Most science fairs accept both, and the biggest one, Regeneron ISEF, scores them on separate rubrics.
This post explains the difference between the engineering design process and the scientific method in plain terms, puts them side by side, and helps you figure out which one your project really uses before you’re three weeks in.
The short answer
The scientific method answers a question. The engineering design process solves a problem. A scientist asks “what happens if…?” and runs a controlled experiment to find out. An engineer asks “how can I make something that…?” and builds, tests and improves a design until it meets goals set at the start.
US science standards draw the same line. The Next Generation Science Standards pair the two on purpose: “asking questions” is the science practice, and “defining problems” is the engineering version of that same first step (National Academies).
So the quickest test is how your project ends. If it ends with an explanation backed by data, that’s science. If it ends with a thing that works, and data showing it works, that’s engineering.
What is the scientific method?
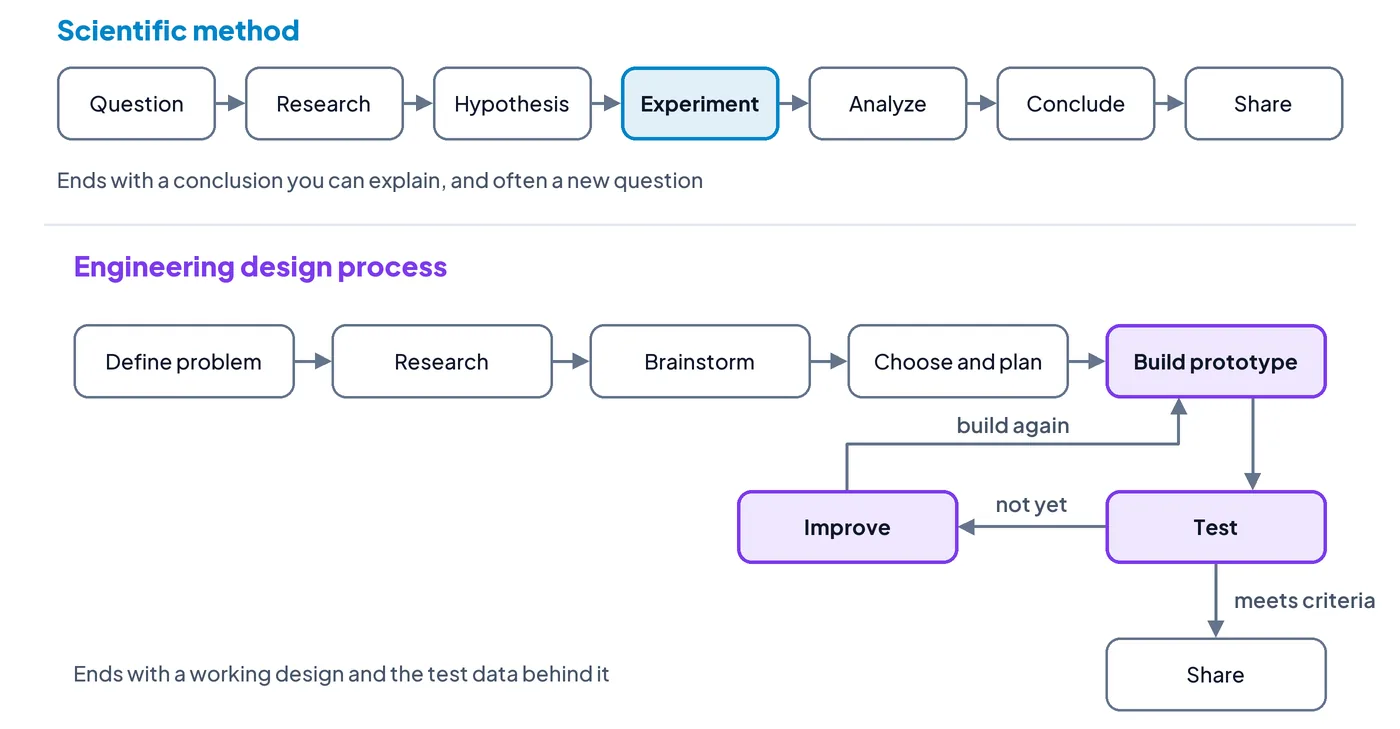
The scientific method is a way to test an idea about how something works, using an experiment fair enough that someone else could repeat it and get the same result.
School versions usually have six or seven steps:
- Ask a question. Make it something you can measure. “Does salt water freeze slower than tap water?” works. “Why is the ocean cold?” is too big for one project.
- Do background research. Find out what’s already known, so your guess is an educated one.
- Write a hypothesis. A testable prediction with a reason behind it: “If I add more salt, the water will take longer to freeze, because salt lowers the freezing point.”
- Run an experiment. Change one thing (the independent variable), measure one thing (the dependent variable), and keep everything else the same. Include a control, like a cup of plain tap water.
- Analyze your data. Average your trials, make a graph, and look for a pattern.
- Draw a conclusion. Did the data support your hypothesis? A wrong hypothesis is still a good result if the test was fair.
- Share your results. That’s your poster, report or presentation.
Real scientists don’t march through these in a neat line. A surprising result often sends them back to research or a brand-new question. For a school project, though, judges look for each piece, so it helps to be able to point to every step.
At Regeneron ISEF, science projects are judged on things like a question that’s testable with scientific methods, variables and controls that are clearly defined, and results that can be reproduced (Society for Science).
What is the engineering design process?
The engineering design process is a loop for building something that solves a specific problem, then testing and improving it until it meets the goals you wrote down at the start. We walk through every step in our engineering design process guide. Here’s the short version:
- Define the problem. Who needs what? Write your criteria (what the design must do, with numbers) and constraints (budget, size, weight, time).
- Research. Look at what already exists and why it falls short.
- Brainstorm. Sketch at least three ideas that work in genuinely different ways.
- Choose and plan. Score the ideas against your criteria, pick one, and plan the build.
- Build a prototype. Start cheap. Cardboard and tape count.
- Test it. Measure it against your criteria, more than once.
- Improve it. Fix what failed, then go back to step 5.
- Share the results. Show the final design, the versions that came before it, and the data.
The big swap is in step 1. Instead of a hypothesis, you write criteria. “Keeps an ice pack frozen for 4 hours” instead of “keeps lunch cold.” Some fairs call this your engineering goal. When a parent on the Science Buddies forum asked how to fit their kid’s idea into a hypothesis, one reply pointed out exactly that: some fairs ask engineering projects for a goal, not a hypothesis.
ISEF’s engineering rubric reflects this. It looks for a practical need, defined criteria and constraints, alternatives you explored, and a prototype tested in multiple trials (Society for Science).
Engineering design process vs. scientific method: side by side
| Scientific method | Engineering design process | |
|---|---|---|
| Starts with | A question about how something works | A problem someone needs solved |
| Your key statement | A hypothesis | Criteria and constraints (your engineering goal) |
| What you change | One variable, with everything else held the same | The whole design, version after version |
| What you build | A test setup | A prototype |
| Counts as success | Data that supports or rejects the hypothesis | A prototype that meets the criteria |
| Shape | Mostly a straight line, ending in a new question | A loop of build, test, improve |
| Ends with | A conclusion you can explain | A working design and the test data behind it |
| First item on the ISEF rubric | Research Question (10 points) | Research Problem (10 points) |
| Example | Does salt water freeze slower than tap water? | Design a lunchbox insert that keeps an ice pack frozen for 4 hours |
The last row is the one to remember. Same kitchen, same freezer, two completely different projects.
Where the two overlap
They have more in common than the red-ink note suggests. Both need fair tests, repeated trials and written records, and both start with research. Judges also care a lot about whether you can explain your own work, whichever process you used.
You can see that in the ISEF rubrics too. The science and engineering versions share the same Creativity & Potential Impact section and the same Presentation section. That’s 55 of the 100 points scored on identical criteria.
Most real projects also borrow from both. Engineers run small experiments inside the design loop all the time. Back in high school, my NASA HUNCH team built NANO LAB, an enclosure for growing microgreens in zero gravity. Along the way we had to test capillary materials to find which one moved water best. That was a small experiment sitting inside a big engineering project, and its answer went straight back into the design.
It works the other way, too. Scientists often have to build their own equipment before they can run an experiment. The question is still scientific, even if a soldering iron was involved.
Which one should you use for a science fair project?
Ask yourself one thing: at the end, do you want to know something, or have something?
If you want to know something, use the scientific method. If you want to have something that works, use the engineering design process.
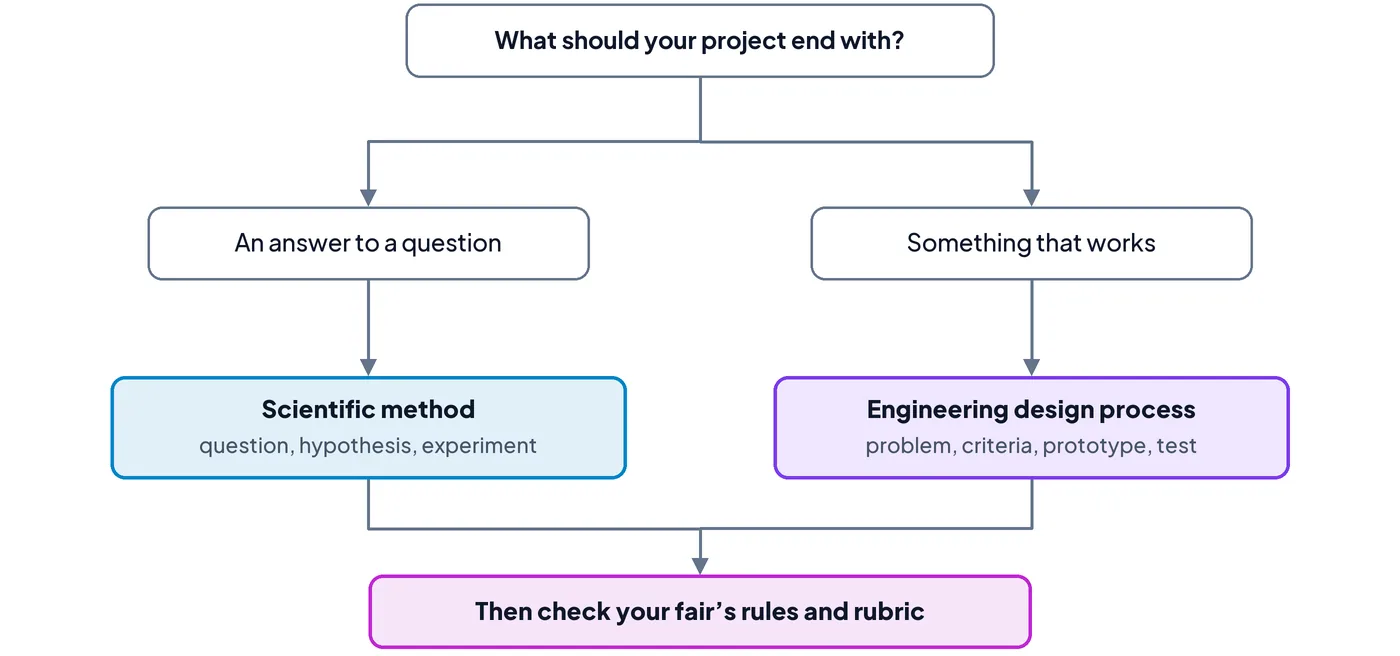
Your project title usually gives it away. Titles that start with “Which,” “Does” or “How does X affect Y” are science. Titles with “design,” “build,” “make” or “improve” are engineering.
Then read your fair’s rules before you write a single word of your proposal. Many regional fairs follow ISEF and have a separate engineering category. Some school fairs only have one rubric, and it’s built around a hypothesis. If that’s your fair, ask the teacher early whether an engineering project is allowed and how it will be graded. Five minutes now beats rewriting your proposal later.
Worked example: one topic, two projects
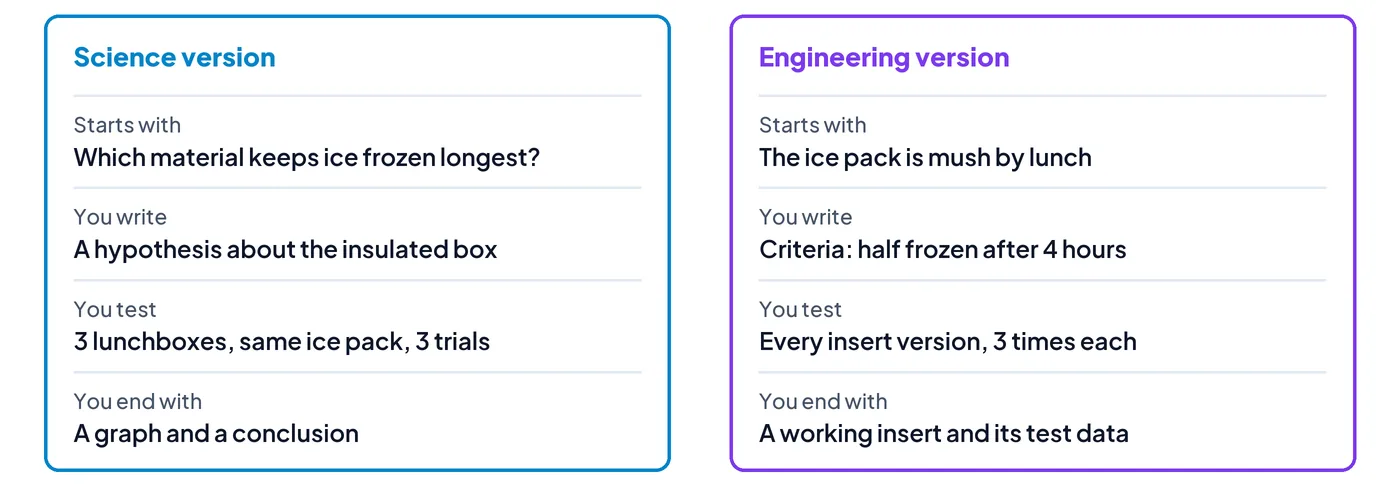
Here’s a made-up but realistic example. The topic is keeping a school lunch cold.
The science version
- Question: Which lunchbox material keeps an ice pack frozen the longest?
- Hypothesis: The insulated lunchbox will keep the ice pack frozen longest, because its foam lining slows heat transfer.
- Experiment: Three lunchboxes (fabric, hard plastic, insulated), the same ice pack size, the same room. Check every 30 minutes. Three trials each.
- Result: A graph of melt time by material, and a conclusion about why.
The engineering version
- Problem: Lunch sits in a backpack for hours before the lunch period, and the ice pack is mush by then.
- Criteria: Keeps an ice pack at least half frozen for 4 hours and fits inside a standard lunchbox.
- Constraints: Under $10 in materials, under 150 grams, done in four weeks.
- Process: Brainstorm three inserts (foam, reflective liner, double wall), score them, build the winner, test it three times, improve it, test again.
- Result: A working insert, photos of every version, and test data showing it hits 4 hours.
The science version teaches you something about materials. The engineering version leaves you with a thing you can put in your backpack tomorrow. Both are good projects. They just get judged on different things.
Common mistakes
- Forcing a hypothesis onto a build. “I predict I can build a guitar amp” isn’t really a hypothesis, and judges can tell. Write clear criteria instead, and say plainly that it’s an engineering project.
- Building something and never testing it. In one online thread, someone remembered a classmate who built a computer for the science fair. The teacher called it an expensive Lego set and gave it an “adequate” ribbon. An engineering project without test data looks like assembly. ISEF specifically wants a prototype tested in multiple trials.
- Vague goals. “Strong,” “fast” and “cheap” can’t be tested. “Holds 5 kg,” “under 10 seconds” and “under $10” can.
- Testing once. One good run might be luck. Repeat every test at least three times, whichever process you use.
- Hiding the failed versions. In an engineering project, a prototype that broke is proof you actually ran the loop. Put it on your board.
- Checking the rubric the week before the fair. By then it’s too late to switch processes. Look at it before you pick your topic, and build your science fair timeline around it.
Doing it in Flowboard
Here’s how we’d set up either process in Flowboard. Each step becomes a card on one canvas with an owner and a due date, so a student, a parent helping out, or a whole team can see what’s done and what’s next.
- Visual project planning: lay out the seven science steps or the eight engineering steps left to right, so you always know which phase you’re in.
- Gates: hold “Run the experiment” until the hypothesis and materials are approved, or hold “Build the prototype” until the design is chosen.
- Sub-boards: give each trial round or each prototype version its own board, so the failed versions stay on record.
- Project documents: attach the fair’s rubric, your data tables and your photos to the step they belong to.
If you’re planning a science fair project now, try Flowboard free for 14 days and set up your board in a few minutes.
Frequently asked questions
What is the difference between the engineering design process and the scientific method?
The scientific method answers a question about how the world works, while the engineering design process solves a problem by building something. Scientists test a hypothesis with a controlled experiment. Engineers test a prototype against criteria and constraints, then improve it. Science ends with a conclusion. Engineering ends with a working design and test data.
Can a science fair project use the engineering design process?
Yes. Most science fairs accept engineering projects, and Regeneron ISEF judges them on a separate engineering rubric. Instead of a hypothesis, you define a problem, set criteria and constraints, build a prototype and test it in multiple trials. Some school fairs only use a scientific method rubric, so check your fair’s rules first.
Does an engineering project need a hypothesis?
No, an engineering project usually doesn’t need a hypothesis. It needs an engineering goal: clear criteria for what the design must do and the constraints it has to work within. If your teacher’s template still asks for a hypothesis, ask whether you can swap in your criteria, or treat one test inside your project as a small experiment.
Is the engineering design process the same as the scientific method?
No. They’re related, but they start in different places. The scientific method starts with a question and a hypothesis. The engineering design process starts with a problem and a set of criteria, then loops through building, testing and improving. Both rely on research, fair tests and careful records, which is why they’re easy to mix up.
What are some examples of engineering design science fair projects?
Good engineering science fair projects solve a small, real problem you can test at home. Examples include a lunchbox insert that keeps ice frozen for four hours, a water filter for muddy water, a bridge that holds the most weight per gram, or a phone stand made from recycled parts. Each one needs measurable criteria.